IoT Device Development: An Overview
15 January 2024
The article gives a brief overview of what is required to develop an IoT device to work with Dash. It covers all three connection types; BLE (Bluetooth LE), TCP and MQTT and any IoT device hardware and is therefore a general description of the steps required for success. Take a look at the code examples to see how it works on specific hardware platforms.
IoT Device Communication Layers
Select an IoT device with suitable characteristics for your requirements. Make sure has the hardware capabillties for the type of comunication you want (i.e. Bluetooth LE, Ethernet or WiFi etc.). Communication between the IoT device and the Dash app is achieved through three abstract layers:
| Layer | Name | Description |
|---|---|---|
| 3 | Your Application | Create Controls. Manage sensors, actuators and other IoT device behaviour and identify them to the Dash Connection layer. |
| 2 | Dash Device and Connections | Create a Device and connections to encode and decode IoT Dashboard messages using a Dash library. |
| 1 | Messaging through BLE, TCP and MQTT connection types | (a) BLE (Bluetooth Low Energy) messaging through BLE peripheral. (b) TCP socket messaging over WiFi or Ethernet etc. (c) MQTT client subscribe and publish messaging over WiFi or Ethernet etc. |
For layer 1, one or more connection types may be used together in an IoT device.
Each layer is easily managed in your IoT device, as described below, and starting with the lowest level layer 1:
Layer 1(a): Bluetooth LE (BLE):
Bluetooth LE is a fast way to connect to an IoT device that is close by. It is easy to connect to because credentials such as a username and password are not required. However, this results in security limitations. Typically, only client can communicate through a BLE connections to an IoT devce at a time.
For basic information on BLE communication, take a look at the excellent introduction at: https://learn.adafruit.com/introduction-to-bluetooth-low-energy/gatt
BLE Setup
BLE communication for Dash is achieved with one BLE service containing a characteristic having the properties write without response and notify. Alternatively, you may use two characteristics; one for write without response and one for notify. You may also use the property write instead of write without response.
Install the appropriate BLE library you have chosen for your IoT device. Your IoT device BLE hardware may require setting unique identifiers (UUIDs) for the service and characteristics of the BLE connection. For example, for the ESP32, you will need to create 128 bit service and characteristic UUIDs. These can be generated using an online tool such as: https://www.uuidgenerator.net/
BLE Device Discovery
The Dash app can perform a BLE scan to discover BLE connected IoT devices. You must ensure that the firat 6 characters of the advertised peripheral name (local name) are "Dash" so that the Dash Dashboard can identify the correct IoT devices.
Layer 1(b): TCP
TCP sockets are another fast way to connect to an IoT device that is close by. TCP provides better secutiry that BLE. TCP can potentially allow multiple clients to connect to an IoT device simultaneously.
WiFi/Ethernet
You will need to install and setup an appropriate WiFi or Ethernet library to allow your IoT device to communicate through your local network. For WiFi, you will require the SSID and password for your local WiFi network.
TCP Socket
Communication with the Dash app is achieved through a TCP socket and your IoT device will be operating as a server on a specified TCP port. Therefore, you may need to install an appropriate TCP server library or it may be part of the WiF/Ethernet library.
TCP Device Discovery
The Dash app can discover the IoT device using mDNS. Therefore, you may need to install an appropriate mDNS library or it may be part of the WiFi/Ethernet library.
For discovery, mDNS search string must be setup with a service-id of "Dash" and a protocol of "tcp". Th service-id and protocol may be combined to become "_DashIO._tcp."
If mDNS is not available in your IoT device, you can manually create a connection to the IoT device in the Dash app. You will need to know the IP address and port for your IoT device.
Layer 1(c): MQTT
MQTT is a great way to send messages between IoT devices and dash the Dash MQTT Server allows connectivity between IoT devices anywhere on the Internet. For more details, take a look at the the MQTT website: https://mqtt.org/
WiFi/Ethernet
You will need to install and setup an appropriate WiFi or Ethernet library to allow your IoT device to communicate through your local network. For WiFi, you will require the SSID and password for your local WiFi network.
MQTT
Install an MQTT client library on your IoT Device and setup the MQTT host. You will need your MQTT account username and password and the MQTT broker URL, port and SSL setting. For the dash Server, the settings are as follows:
| Setting | Value |
|---|---|
| URL | dash.dashio.io |
| Port | 8883 |
| SSL | enabled |
There are four MQTT topics that are used for sending and receiving messages through the MQTT publish and subscribe system and their structure is:
“username / device_ID / topic_tip”
The username is the MQTT account username and the device_ID is a unique identifier for the IoT device, typically the mac address from the comms peripheral in the IoT device.
The topic_tip is the only part of the topic that differs between the four topics. The topic_tip may be one of the following:
| topic_tip | Description |
|---|---|
| “control” | The IoT device subscribes to the Control topic to receive Control messages from the Dash app. |
| “data” | The IoT device publishes messages for the Dash app on the data topic. |
| “alarm” | The IoT device may publish alarm messages through the alarm topic. The dash server uses the alarm messages to create Push Notifications for the mobile phone or tablet running the Dash app application. Alarm messages are only available if you are using the dash server. |
| “announce” | When an IoT device is powered up, it should publish an announce message to register the IoT device with the dashsServer. Announce messages are only available if you are using the Dash server. |
MQTT Device Discovery
The Dash app can discover the IoT device using an MQTT connection ONLY if it is using dash, the Dash MQTT broker. The IoT device must send an announce message on the anounce topic for device discovery to be successful. The dash server sends a list of known connections to the Dash app so the app can discover the IoT device.
Layer 2: Dash Device and Connection
Download and include the Dash library in your IoT device project.
Create Device Object Instance
Create a DashioDevice from the Dash library. The DashioDevice stores the unique device identifier and is used to create messages for sending to the Dash app. Typically, the device identifier is obtained from the mac address of the communications peripheral of the IoT device, alternatively a UUID may also be used.
Create Connection Object Instances
Create one Connection from the Dash library for each connection type you are using in Layer 1. The connections are used to process and store incoming messages.
Layer 3: Your Application
Build the input and output functionality, sensors, displays, buttons and other behaviour into your IoT device and assign these to the Connections. This is the process of creating the back-end of the Controls in the IoT Device. Each Control will require a unique control_ID for its connection, so that the Dash app can identify it.
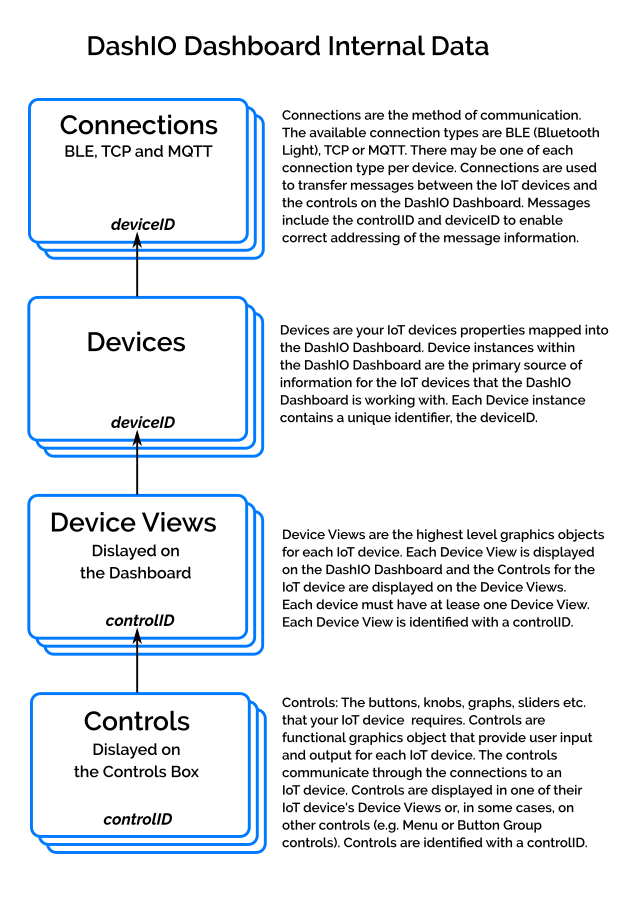
Connections, Devices, Device Views and Controls
The Dash app enables user configurable Controls to be placed on Device Views on the Dash app. The Controls model the behaviour of the IoT device. Each Control is able to display information received from the IoT device or to send Control information to the IoT device.
Messages are used to send and receive data between Controls on the Dash app and corresponding abstract Controls within the IoT device. Connections are use to manage the messages. A connection is required for each connection type (BLE, TCP or MQTT) supported by the IoT device.
Each Control belongs to, and is displayed on, a Device View on the Dash app. Each Device View belongs to an IoT device. Device Views are displayed on the Dash app in columns. The Device View’s height has a maximum value of the screen height and width of one to three columns. The number of columns on the Dash app differs between phones and tablets as follows:
Phone
- Orientation: Portrait only
- One column
Foldable Phone
- Orientation: Portrait only
- Two columns
Tablet
- Orientation: Landscape only
- Three columns
A Device View contains a number of user configurable parameters that combine into a theme for the Device View. All Controls on the Device View are displayed according to the theme of the Device View.
The following figure shows the relations ship between Controls, Device Views, devices and connections: