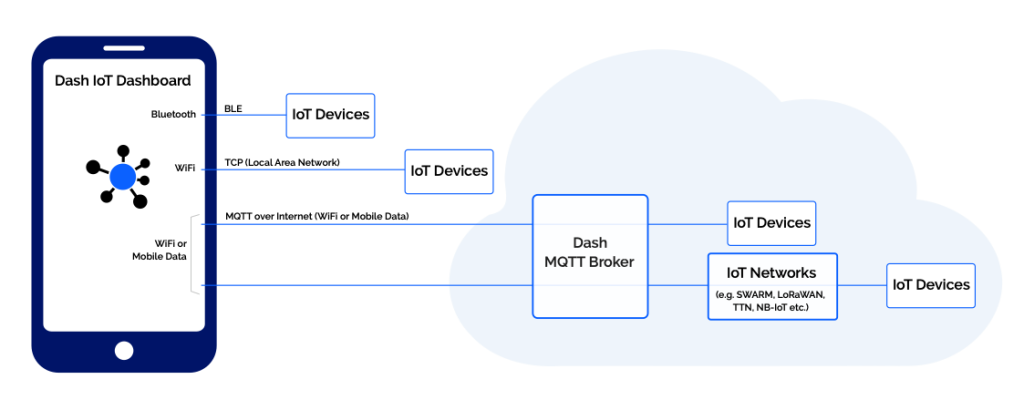
The Dash app can establish a direct connection with your IoT device using Bluetooth BLE or TCP connections. To connect to remote IoT devices, you need the Dash MQTT broker. An IoT device can be connected using one or more connection types (BLE, TCP, or MQTT). This facilitates rapid and direct connection when the user is near the IoT device and remote connection via the Dash MQTT broker when the user and the IoT device are separated.
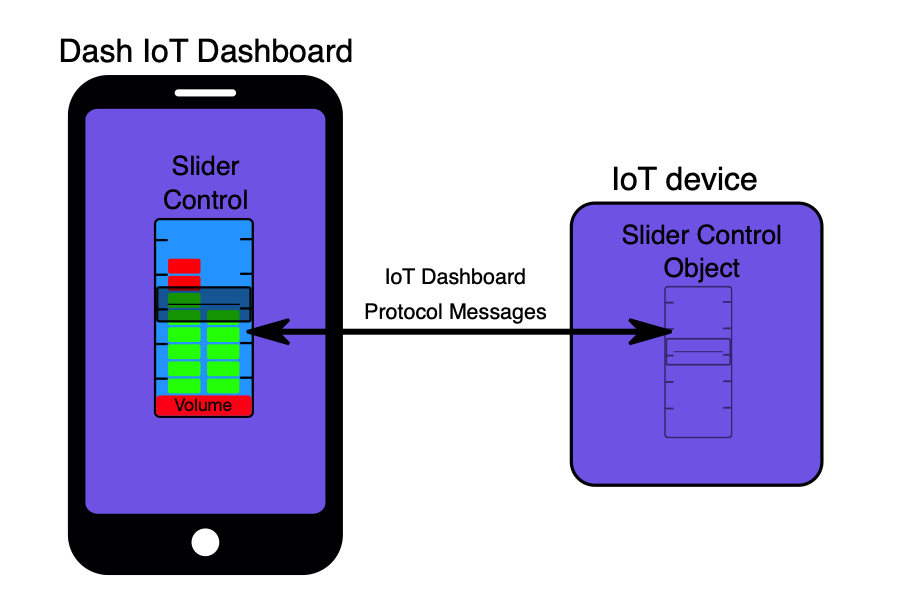
The Dash Protocol enables the exchange of information between controls (buttons, knobs, charts, graphs etc.) on the Dash app and their counterparts in the IoT device. It operates across all connection types (BLE, TCP and MQTT).
Dash Protocol Features
ASCII text messages (Human readable).
Easy to generate and parse.
Designed to be transported by any network.
Variable length messages.
Asynchronous communication.
Routable.
Extensible.
Open for anyone to use.
Messages containing information about the values of controls are transfered between the Dash IoT Dashboard and your IoT device. These messages are defined in the Dash Protocol, as are messages that allow for Push Notifications (alarms or events), device discovery and configuration. Configuration messages enable IoT devices to send the control designs and their layout onto the Dash app.
Dash Key Concepts
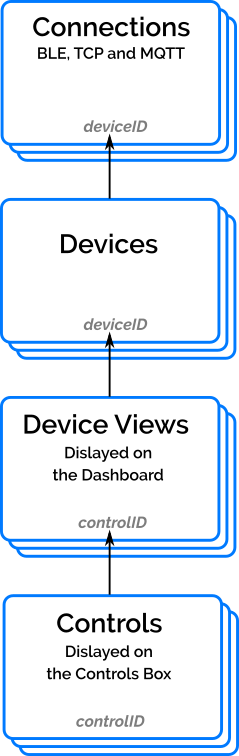
Connections: The method of communication. The available connection types are BLE (Bluetooth Light), TCP or MQTT. There may be one of each connection type per device. Connections are used to transfer messages between the IoT devices and the controls on the Dash IoT Dashboard app. Messages include the controlID and deviceID to enable correct addressing of the message information.
Devices: Your IoT devices properties mapped into the Dash app. Device instances within the Dash app are the primary source of information for the IoT devices that the Dash app is working with. Each Device instance contains a unique identifier, the deviceID.
Device Views: The highest level graphics objects for each IoT device. Each Device View is displayed on the Dash app and the Controls for the IoT device are displayed on the Device Views. Each device must have at lease one Device View. Each Device View is identified with a controlID.
Controls: The buttons, knobs, charts, graphs, sliders etc. that your IoT device requires. Controls are functional graphics object that provide user input and output for each IoT device. The controls communicate through the connections to anIoT device. Controls are displayed in one of their IoT device’s Device Views or, in some cases, on other controls (e.g. Menu or Button Group controls). Controls are identified with a controlID.
For a detailed description of the DashProtocol, please download the Dash Protocol specification. However, an in depth knowledge of the DashProtocol is not necessary to get started and set up your device to connect with the Dash app.
Each IoT device may communicate with the Dash app with one or more of the three connection types available; Bluetooth LE (BLE), TCP, and MQTT. If more than one connection is enabled and actively communicating between the Dash app and IoT device, the messages are only transmitted through the connection with the highest priority. The priority order, from highest to lowest is 1) BLE, 2) TCP, 3 MQTT.
The Dash Protocol operates over all connection types, with only minor differences required for device discovery.
BLE
A BLE IoT device connection can be easily setup to operate with the Dash Protocol. Device discovery is achieved with the Dash app scanning for BLE enabled IoT devices which must be setup as follows:
The IoT device is setup as a BLE peripheral.
The peripheral (local name) should be set to the device type. Do NOT set the peripheral name to the device name because the device name can be changed via the Dash Protocol, but changing the peripheral name can cause significant confusion as it is usually cached in the BLE Central (client).
The Service UUID must be advertised and the peripheral must be connectable. No additional or secondary advertised data is required. Some BLE peripherals advertise the Service UUID by default, while others must be specifically setup to advertise the Service UUID.
The advertised service must have notify and write characteristics. It may be a single characteristic containing both notify and write properties.
The Dash Protocol must be operating.
Device discovery is not complete until a Dash Protocol WHO request message is written to the discovered device, and receipt of the WHO response message is received from the IoT device and validated. Secure (encrypted) BLE connections may be used. Please note that BLE libraries can be resource intense, such as ESP32 BLE libraries.
TCP
TCP connections require an IP address and port. The Dash app will always attempt to connect to TCP communicating IoT devices over the local network that the Dash app is operating on. Therefore, if the IoT device is not on the same local network as the dashboard, they will not be able to connect.
Device discovery is achieved with mDNS. Using mDNS allows the Dash app to discover IoT devices on any port on the local network having the mDNS service “_DashIO._tcp.“. A Dash Protocol WHO request message is written to the discovered device. Receipt of the WHO response message from the IoT device validates that the discovered device is available to be used with the Dash Protocol. No additional service text messages are required.
MQTT
MQTT connections can be made using the Dash Cloud MQTT broker, using the publish and subscribe topics defined in the Dash Protocol.
Device discovery is an integral part of the Dash Cloud Services and is initiated by the IoT device sending a Dash Protocol WHO message to the announce MQTT topic. The WHO message contains the device identifier, device type and device name which are retrieved by the Dash MQTT broker and stored as an available device for the particular user. The Dash app retrieves the available IoT devices from the Dash Cloud Services database.
Push notifications (events or alarms) can created with Dash Cloud Services. The IoT device can send a notification message to the alarm topic which contains the notification information. This information is retrieved by the MQTT broker and sent to the push notification server, which sends the notification to your mobile device.
The Dash Cloud Services MQTT broker connection must use SSL.
Devices
The Dash app contains a list of virtual Devices that have been loaded into the Dashboard. Each device may be selected to show information including the device name, device type and which connections are being used. Each connections can be selected from the virtual device to view and edit the connection details and to view the incoming and outgoing messages.
For IoT devices connected through the Dash Cloud MQTT broker, if the device within the Dash app is selected, the user can view and manage alarms and sharing of the device.
Device Views
All controls for IoT devices are presented on the Dash app in Device Views. A Device View contains the theme (i.e. layout information and general colors) for all the controls present on the Device View.
Device View Size
The Dash app is always displayed in portrait style on a phone and landscape style on a tablet.
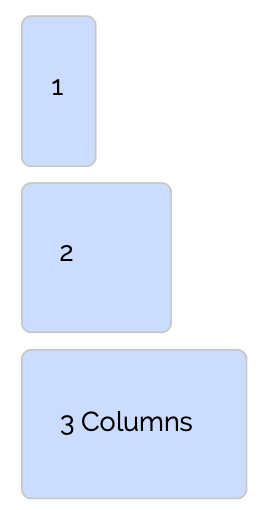
Device Views are presented in a column format so the user can scroll horizontally between the columns and device views. One column is the width of a phone in portrait style. Tablets are 3 columns wide. The default Device View height is the height of the screen the Device View is being presented on.
Device Views are scaled according to the device they are presented on and can be one of three sizes with differing widths, but having the same default height. The width is defined by the number of columns of the device view and may be 1, 2 or 3 columns wide. The width to height ratio of a single column Device View is very approximately 1 to 2.
For phones, single column device views generally look better than multiple column Device Views. However, for complex layouts that are mainly for use on tablets, wider Devices Views may provide a better solution. Note that the IoT device can configure different Device Views for phones and tablets.
Controls
Controls are used on the Dash app as a means of sending actions to the IoT device and displaying information from the IoT device. They may be setup anywhere on a Device View on the Dash app and configured to meet your design requirements. They can be easily resized, colored and have their behavior adjusted as needed. Each control transfers information with its virtual counterpart in the IoT device.
The IoT device may send information to controls in the Dash app at any time. Even controls that send actions to the IoT device (e.g. buttons) are also capable of receiving information from their counterparts in the IoT device and displaying the data. When the user causes an action through a control on the Dash app, the IoT device should respond to indicate that the actions has occurred. The response is then shown on the control on the dashboard, therefore ensuring feedback is provided to the user of the Dash app.
For a detailed description of how each control works, please download the Dash Controls document.
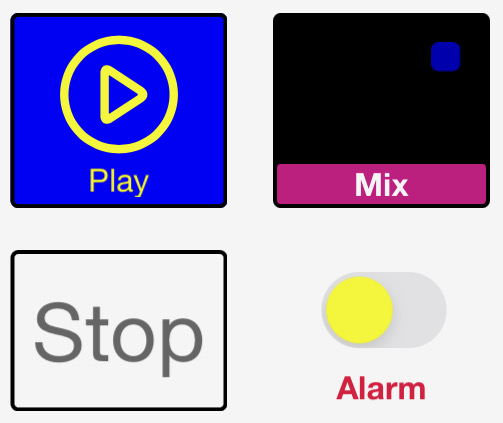
A Button allow the user to send a simple action, informing the IoT device that the button has been pressed. The button state (on or off color) is not changed by tapping the button. After the IoT device receives a message containing the action, it sends a message back to the control in the dashboard to set the button state.
A Button control behaves as both as a momentary push button for user input and as a status indicator to provide feedback from the IoT device.
The IoT device may also change the button icon and text of the control.
Sliders
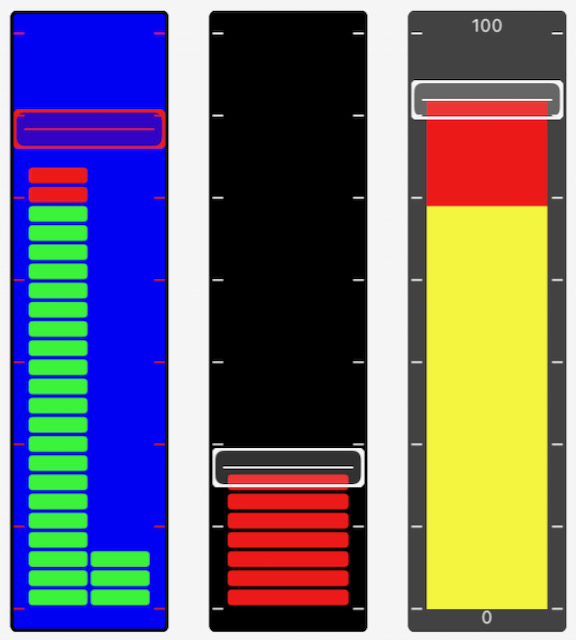
A Sliders allow the user to send a numerical values to the IoT device when the user drags the slider to a new position. The slider also includes bar graph that can be set by the IoT device. The bar graphs can be controlled independently of the slider or can be used to provide feedback to the user from the IoT Device.
The IoT device may send messages to update both the bar graph and the slider knob positions. The bar graph may set to have two bars.
The knob of the slider may be disabled so that the slider becomes a simple bar graph indicator.
Knobs
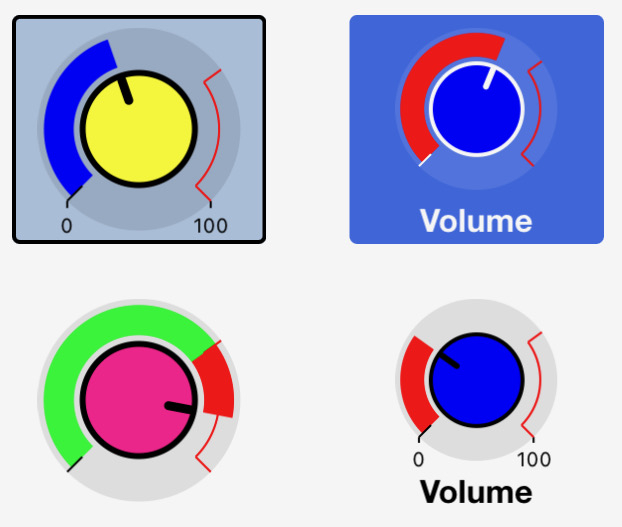
A Knob allow the user to send numerical values to the IoT device when the user drags the knob to a new position. A Knob control contains a user adjustable knob surrounded by a simple dial indicator. The dial can be controlled independently of the knob or can be used to provide feedback to the user from the IoT Device.
The IoT device may send messages to update both the dial and knob positions.
Dials
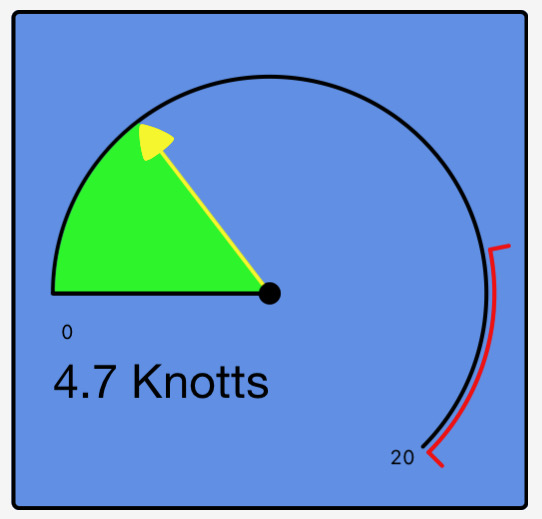
A Dial display is used to present a numerical value in a graphical circular dial. The Dial display receives messages from the IoT device to set the dial position.
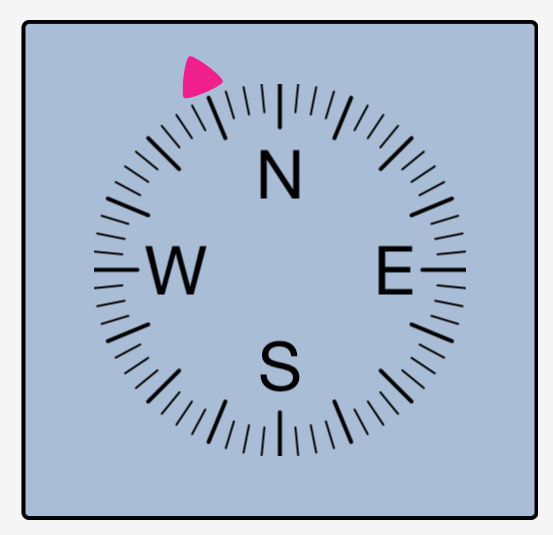
Directions
A Direction display is used to graphically present a decimal direction value from 0 to 360 degrees. The Direction display receives messages from the IoT device to set the direction indicator position.
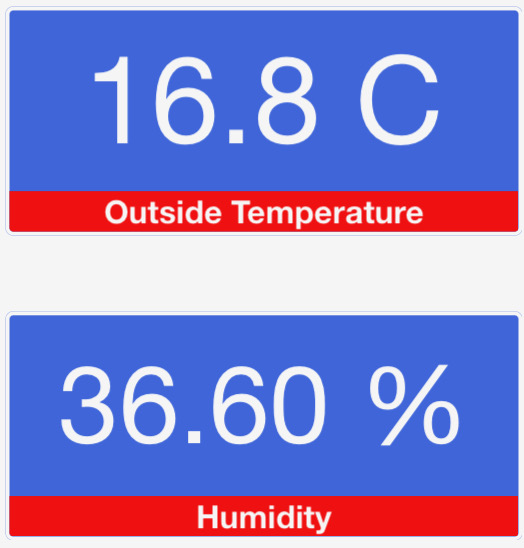
Text Boxes
A Text Box control receives simple line text messages from the IoT device to display on the Dash app. The text may optionally be plain text, reformatted as a number or, when the text is ISO8601 date/time, it may be formatted to a date/time that is easy to read.
The Text Box may also allow the user to input text. Touching the control will present the user with a keyboard where the user can enter text. When the Send button on the keyboard is pressed, the message will be sent to the IoT device.
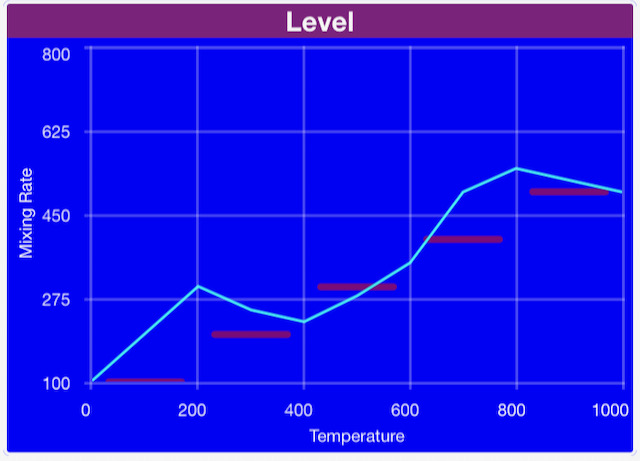
Charts
A Chart display is used to present graphical data on the Dash app, where the data is a series of vertical (Y) axis data. The data is evenly spaced on the horizontal (X) axis. The IoT device sends a message for each line in the chart. The data may be shown as lines, bars or peak values.
Each line can be independently added, deleted or changed by the IoT device. Multiple IoT devices can add lines to a single Chart control.
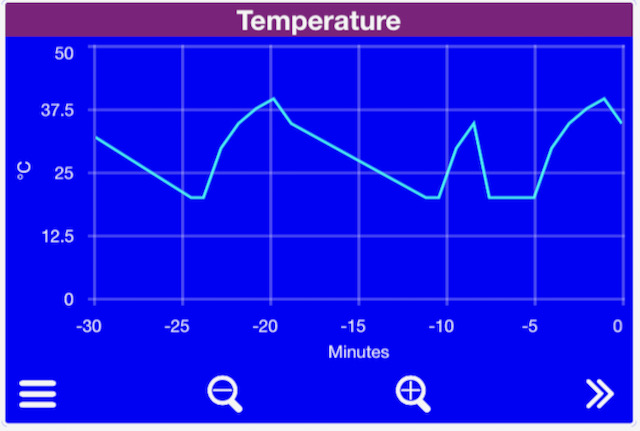
Time Graphs
A Time Graph display is used to present time-series graphical data on the Dash app, where the data is a series of points containing the time on the horizontal axis and other data on the vertical axis. The IoT device sends messages for each line in the graph. Each message contains one or more data points and the Dash app appends the incoming data to create a data series that can be presented, panned and zoomed by the user. The data may be shown as lines, bars or blocked areas.
Each line can be independently added, deleted or changed by the IoT device. Multiple IoT devices can add lines to a single Time Graph control.
Graph data may be stored in either the IoT device or the Dash cloud from where it is uploaded into the dashboard.
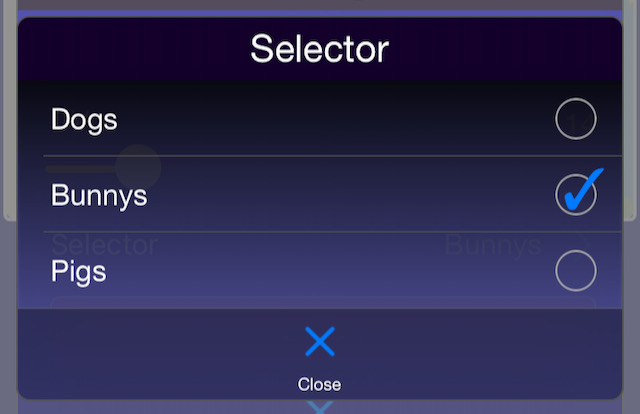
Selectors
A Selector control is used to present a popup list of options that the user can select from. When a Selector is tapped, the Dash app presents the list of text options to the user to make their selection from. The user can tap on an option to select is and the index of the selected option will be sent to the IoT device.
Feedback to the user of the dashboard is achieved when the IoT device responds to the selection message. The dashboard updates the Selector control check box with this value.
Menus
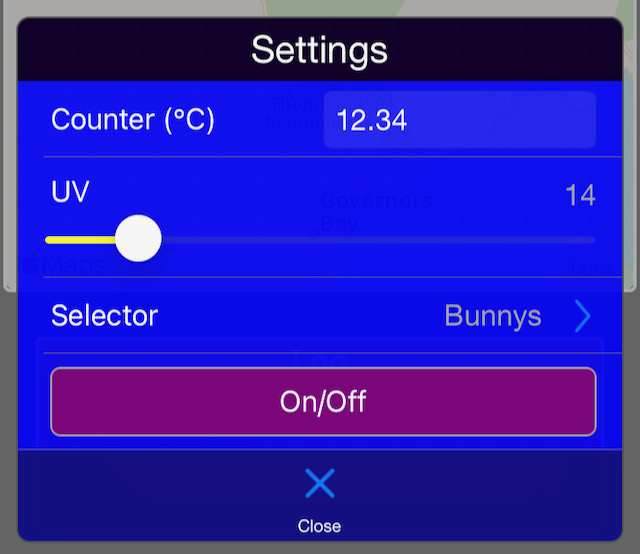
A Menu control is used to present a popup table of user adjustable controls and is ideal for presenting a list of IoT device setup parameters. The Menu does not receive messages directly, but presents a list of other controls (sub-controls) that send and receive messages of their own.
Controls that can be included in a Menu control are Text Boxes, Sliders, Selectors and Buttons.
Button Groups
A Button Group control is used to present a popup grid or table of Button controls. The Button Group does not receive messages directly, but presents Button controls that send and receive messages.
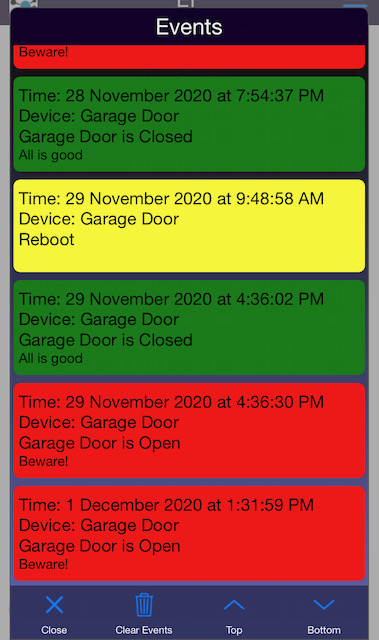
Event Logs
An Event Log display is used to present time stamped events or alarms from IoT devices. The most recent event is shown on the control and a scrollable list of events is presented when the Event Log is tapped by the user.
Each event contains the time of the event, the color to display the event and the text to display.
Multiple IoT devices can be shown on a single Event Log control.
Event data may be stored in either the IoT device or the Dash cloud from where it is uploaded into the dashboard.
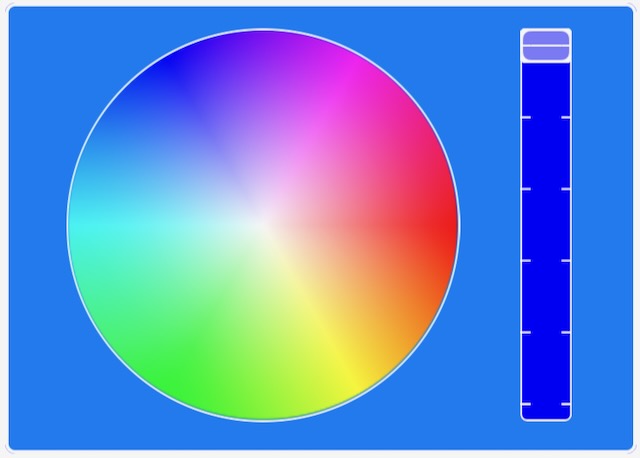
Color Picker
A Color Picker control is used to select a color to send to the IoT device. The Color Picker may be shown as either a spectrum or as a color wheel and brightness slider.
AV Display
An Audio Visual display allows the IoT Device to send a URL to the Dash app to play or display the contents of the URL.
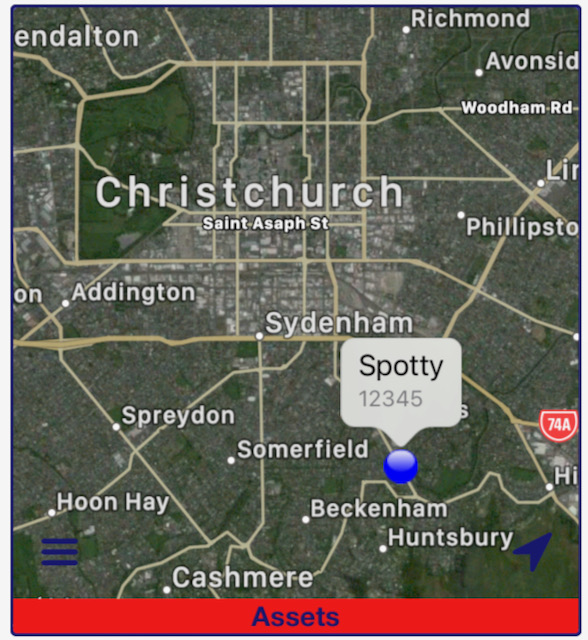
Maps
A Map display is used to plot positions on a map. The Map display receives messages from the IoT Device that contain latitude and longitude to mark the position. Additional data, such as speed and altitude may also be included and shown on the Map display.
Multiple IoT devices can be shown on a single Map.
Labels
A Label is a simple control to add structure to your layout on the dashboard. They do not transfer information with IoT devices.
Automated Configuration
Setting up your IoT device for automated configuration allows the IoT device to send all the required information for the layout of the controls and connections onto the Dash app. If you are going to share access to your device to others, or distribute a product, then automated configuration is essential for your users to simplify setting up their Dash app.
Automated configuration transfers information from the IoT device to the Dash app for:
Each Connection
The Device
Each Device View
Each Control
An overview of the process for creating an IoT device with automated configuration is as follows:
Develop your IoT device to a point where you can establish a connections with the Dash app.
On your Dash app, discover and your IoT device and connect to it through all connection types you wish to use.
On your Dash app, manually add device views, and controls and set their positions, colors and other parameters to your requirements. Make sure you set a Control ID for each control.
Select your device from the Devices menu and press the Export Layout button. This will allow you to receive an email of the layout configuration.
Make sure the controls in your IoT device use the Control_IDs as specified in the layout configuration.
Copy the C64 Layout Configuration Text from the layout configuration into your IoT device code. When a CONFIG message is received by your IoT device, your IoT device must send the C64 Layout Configuration Text back to the Dash app. See the Dash Protocol specification or the relevant software guide on the Documents page for more details.
IoT Device Provisioning
Setting up your IoT device for provisioning allows the Dash app to easily adjust credentials and other device information over any available connection to the IoT device (BLE, TCP or MQTT). This is particularly useful when the IoT device has a BLE connection or TCP Soft Access Point (AP) that can be use to provision WiFi and Dash account settings.
Items that are able to be provisioned are:
IoT device name
WiFi SSID and password
Dash account username
Reset device
An overview of the provisioning process is as follows:
Make sure provisioning is setup in your IoT device. See the Dash Protocol specification or the relevant software guide on the Documents page for more details.
Select your IoT device from the Devices menu and press the Provisioning menu. The specific provisioning options available on the IoT device will be shown in the menu.
Enter and send the provisioning information as required.
Dash IoT Dashboard Overview
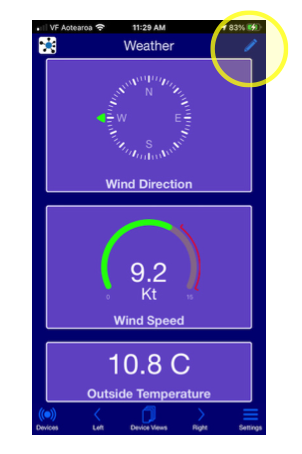
The Dash app contains a set of device views with controls located on them. The buttons at the top left and top right and at the bottom of the screen are all that is required to use the Dash app.
Context sensitive help is available in menu of the menus. Simply tap the “?” button at the top right of the menu.
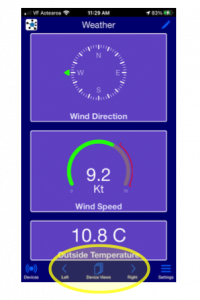
Navigation
The navigation buttons allow the user to move Left or Right through the device views or to jump to a specific device view from the Device Views menu.
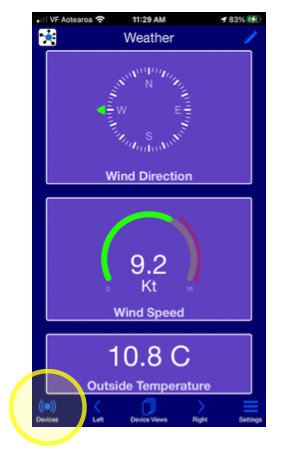
Devices Menu
Tap the Devices button to bring up a list of all IoT devices that are known to the Dash app. From the devices menu you can perform the following device related functions:
Find and attach new devices
Delete the device
View the connections and a live stream of the connection messages
Perform device setup (device name, passwords etc)
Download the configuration (layout and controls) for the device
Manage alarms
Manage device sharing
Retrieve the device layout configuration data
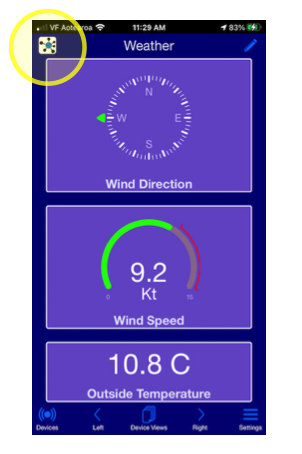
Account Menu
Tap the Dash account button to setup and edit your account settings. Although an account isn’t necessary to use the Dash app, it provides the following benefits:
MQTT broker for MQTT connections
Push notifications (events or alarms)
Sharing of IoT devices to other users
Saving and loading of the Dash controls and layout
Reviewing and deleting Dash dashboards apps attached to the account
Reviewing and deleting IoT devices attached to the account
Settings Menu
Tap the Settings menu button to:
Adjust Dash app settings such as units and toolbar behavior.
View product information
View help menus
Contact information
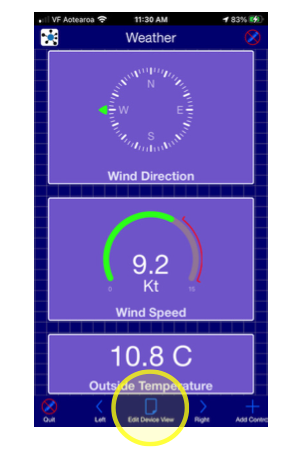
Edit Mode
A Device View can be set to edit mode to allow the user to changes the layout of the controls, adjust the behavior of the controls and add or delete controls. Tap the Edit button to enter edit mode and a grid will be shown behind the controls. When you have finished editing, tap the Edit button again to exit edit mode.
Use edit mode to design the controls and layout for your IoT device. Once your design is complete, you can export your design in JSON format and use this information to setup the config messages in your IoT device. This will allow any dashboard that connects to your IoT device to be able to automatically configure the dashboard for the controls and layout specific to your IoT device.
Tap anywhere on the grid where there are no controls to edit the details of the device view that is being edited..
Edit Device View
When a Device View is in edit mode, you can tap on the EditDevice View button to edit the device view parameters and theme for the controls.
Specifications
All features and specifications are subject to change without notice.
Item
Specification
Value
TimeGraph
Maximum number of points per line stored on the Dash Cloud
100,000
TimeGraph
Maximum number of graph lines per TimeGraph stored on the Dash Cloud
20
EventLog
Maximum number of events per EventLog stored on the Dash Cloud